It's Christmas Eve and soon it will be a new year! Time passes so very fast. The older I get the faster it seems to fly by.
The past few years have held surprises, surgeries that were certainly unexpected, but were successful, and many other events. This year held the biggest surprise of all - - - breast cancer. I had surgery at the end of July, a healing period, then radiation treatments. Then over a month to get over side effects of the treatments. So it's been an eventful year but a wonderful one because the C had not spread and the surgeon was able to remove all of it!
I hope your year has been as good and that the coming new year is a fantastic year for us all!
Merry Christmas and Happy New Year!
Are you prepared?


Thursday, December 24, 2015

Wednesday, November 11, 2015
Geeze! It's been over a year
It has been over a year since I was last on here. Amazing...
I hope to put a few more patterns up soon. I want to put all that I've done on here for free use.
In July the doctor found a lump in my breast, that turned out to be cancer. I hope everyone will stay up to date on their mammograms! That is what saved me. They performed a lumpectomy or partial-mastectomy and were able to get all of it. It had not spread to my lymph nodes, and subsequent tests were good, so no chemo. I did have radiation treatments for over a month. They are finished, but I'm still not over the side effects. Hopefully in another month I will be back up to par and able to crochet again.
Many have used my Spidey'ghan pattern, and I am asking you all to have your annual mammogram. They are not fun to have, but one might save your life as it did mine! For which I am very grateful and thankful.
Many hugs to everyone. Keep on hooking and enjoy Life!
I hope to put a few more patterns up soon. I want to put all that I've done on here for free use.
In July the doctor found a lump in my breast, that turned out to be cancer. I hope everyone will stay up to date on their mammograms! That is what saved me. They performed a lumpectomy or partial-mastectomy and were able to get all of it. It had not spread to my lymph nodes, and subsequent tests were good, so no chemo. I did have radiation treatments for over a month. They are finished, but I'm still not over the side effects. Hopefully in another month I will be back up to par and able to crochet again.
Many have used my Spidey'ghan pattern, and I am asking you all to have your annual mammogram. They are not fun to have, but one might save your life as it did mine! For which I am very grateful and thankful.
Many hugs to everyone. Keep on hooking and enjoy Life!
Friday, August 29, 2014
Two-Sided Scrubbie
Two Sided Scrubbie : Copyright: Gail E and Wendy G ; January 15, 2007


![[★]](wlmailhtml:{1AAF0422-9671-458D-9571-D79EA4BC31B0}mid://00000037/!x-usc:https://s.yimg.com/pw/images/spaceball.gif)
One side is made with nylon yarn and the other side is made with cotton to hold the soap. I have been using mine for years and it
really works great on everything I’ve used it for.
With this little Scrubbie, there is no need for
a pan of water to wash dishes in, just wet the
scrubbie with hot water, dribble a little dish
soap on the cotton side, squish it together to
distribute the soap a bit and start washing.
I prefer to use the synthetic side for everything.
It does not scratch anything, but gets things clean
faster. They are also great in the bathroom, for
bathing and for cleaning.
Supplies Needed:
Small amount worsted weight nylon/synthetic
yarn.
Small amount worsted weight cotton yarn.
Size H/8 5mm crochet hook
Yarn needle for weaving in ends.
3” Scrubbie
Side 1: Cotton Side
Rnd 1: With cotton yarn, ch 4. Join w/slst to first ch
to form ring. (Or make Magic Circle), ch 2, make 12dc
in ring. Join w/slst to top of first dc. (secure yarn end if you used MC
method)
Rnd 2: Ch2. 2dc in same st as join, and in each dc
around (24 dc)
Rnd 3: Ch2. 2dc in same st as join, and in each dc
around (48 dc)
Join w/slst to first dc. Fasten off cotton yarn and
weave ends into work.
Side 2:
Rnd 1: With synthetic yarn. Ch4, join w/slst to first
ch to form ring. Ch2, make 12dc in ring. Join w/slst to top of first
dc.
Rnd 2: ch 2, 2dc in same st as join and in each dc
around. Join w/slst to top of first dc. (24 dc)
Rnd 3: Ch2. 2dc in same st as join, and in each dc
around (48 dc)
To join both layers on the last round:
Ch 1, Hold both rounds with wrong sides together. With
right side of synthetic circle facing you, insert hook in same st as join (*)
BLO of synthetic side, and FLO of cotton side, and sc. Continuing to work
through both loops, sc in each stitch around. Join with sl st to first
sc.
Fasten off and weave ends into work.
(*) You will be inserting the hook through the
synthetic and cotton loops that are touching. If you have any
problems/questions, please email me with them at Stitch_n_Frog@mchsi.com
6” Scrubbie
Side 1: Cotton Side
Rnd 1: With cotton yarn, ch 4. Join w/slst to first ch
to form ring. (Or make Magic Circle), ch 2, make 12dc in ring. Join w/slst to
top of first dc. (secure yarn end if you used MC method)
Rnd 2: Ch2. 2dc in same st as join, and in each dc
around (24 dc)
Rnd 3: Ch2. 2dc in same st as join, and in each dc
around (48 dc)
Rnd 4: Ch 2, 2 dc in same st as join, (1 dc in next st,
2 dc in next st) repeat around.
Join w/slst to first dc. Fasten off cotton yarn and
weave ends into work.
Side 2:
Rnd 1: With synthetic yarn. Ch4, join w/slst to first
ch to form ring. Ch2, make 12dc in ring. Join w/slst to top of first
dc.
Rnd 2: ch 2, 2dc in same st as join and in each dc
around. Join w/slst to top of first dc. (24 dc)
Rnd 3: Ch2. 2dc in same st as join, and in each dc
around (48 dc)
Rnd 4: Ch 2, 2 dc in same st as join, (1 dc in next st,
2 dc in next st) repeat around.
To join both layers on the last round:
Ch 1, Hold both rounds with wrong sides together. With
right side of synthetic circle facing you, insert hook in same st as join (*)
BLO of synthetic side, and FLO of cotton side, and sc. Continuing to work
through both loops, sc in each stitch around. Join with sl st to first
sc.
Fasten off and weave ends into work.
Note: I make sets of 3 scrubbies for gifting or
selling. With one 6” and two 3” scrubbies making a set. I use a length of
coordinate ribbon, to tie the set together.
You may make and sell Scrubbies that you make, because
I have a problem with believing that I am the first to discover how to make two
crocheted flat round circles and place them back to back~
~~~Happy Hooking
Monday, August 25, 2014
Crochet Stitch Sampler Hat & Scarf

Crochet Hat and Scarf Pattern
Copyright Jan 2007 by Gail E and Wendy G
Adult Size Scarf
6 oz Worsted Weight 4-ply yarn for scarf & hat
I hook for Adult
H hook for Child
Needle to work ends in
Ch 21
Row 1: sc in 2nd chain from hook and in each stitch to end (21
sts) ch 2, turn. (20 stitches throughout)
Row 2: 1 hdc in first st and each st to end. Ch 2, turn.
Row 3: 1 dc in 2nd stitch and each st to end. Ch 3 turn.
Row 4: 1 tr in 2nd stitch and each st to end. Ch 4, turn.
Row 5: tr in 4th st, *ch 1, tr in first skipped stitch, skip 2 sts, tr in next stitch – repeat to end, ending with
1 tr in last st. Ch 1, turn.
Row 6: 1 sc in 1st st and each stitch across. Ch 1, turn.
Row 7: 1 BLO sc in each st across. Ch 1, turn.
Row 8: 1 FLO sc in each st across. Ch 2, turn.
Row 9: 1 hdc in first st and each st across, end with hdc in last st. Ch2, turn.
Row 10 & 11: *FP hdc in next st, BP hdc in next st – repeat across, ending with hdc in 2nd ch of turning
chain. Ch 2, turn.
Row 12: *FP hdc in next st, BP hdc in next st – repeat across, ending with hdc in 2nd ch of turning chain.
Ch 1, turn.
Row 13: sc in each st across. Ch 1, turn.
Row 14: 1 BLO sc in each st across. Ch 1, turn.
Row 15: 1 FLO sc in each st across. Ch 4, turn.
Row 16: tr in 4th st, *ch 1, tr in first skipped stitch, skip 2 sts, tr in next stitch – repeat to end, ending
with 1 tr in last st. Ch 1, turn.
Repeat rows 13-16, 20 times, or until almost as long as you want the scarf.
For Ending of Scarf:
Row 1: sc in each st across. Ch 1, turn.
Row 2: 1 BLO sc in each st across. Ch 1, turn.
Row 3: 1 FLO sc in each st across. Ch 2, turn.
Row 4: 1 hdc in first st and each st to end. Ch 2, turn.
Row 5, 6, 7: *FP hdc in next st, BP hdc in next st – repeat across, ending with hdc in 2nd ch of turning
chain. Ch 2, turn
Row 8: *FP hdc in next st, BP hdc in next st – repeat across, ending with hdc in 2nd ch of turning chain.
Ch 1, turn.
Row 9: sc in each st across. Ch 1, turn.
Row 10: 1 BLO sc in each st across. Ch 1, turn.
Row 11: 1 FLO sc in each st across. Ch 4, turn.
Row 12: tr in 4th st, *ch 1, tr in first skipped stitch, skip 2 sts, tr in next stitch – repeat to end, ending
with 1 tr in last st. Ch 1, turn.
Row 13: 1 sc in 1st st and each stitch across. Ch 4, turn.
Row 14: 1 tr in 2nd stitch and each st to end. Ch 2, turn.
Row 15: 1 dc in 2nd stitch and each st to end. Ch 2 turn
Row 16: 1 hdc in first st and each st to end. Ch 1, turn.
Row 17: 1 sc in 1st st and each stitch across.
End yarn. Add fringe to both ends, in each corner and every 3rd stitch across.
Child’s Size Stitch Sampler Scarf
3 oz 3-ply/Sport Weight yarn for scarf & hat
H hook
Needle to work ends in
Ch 15
Row 1: sc in 2nd chain from hook and in each stitch to end (14 sts) ch 2, turn. (14 stitches throughout)
Work all rows the same as the adult scarf, when almost long enough to suit you, skip to Row 1 of
Ending of Scarf.
Adult & Child Stitch Sampler Cap
Ch 5, join with sl st to form a ring.
Rnd 1: ch 3, make 13 dc in ring, join with sl st in 3rd ch of starting chain. (14 dc)
Rnd 2: ch 3, 1 dc in same stitch as joining stitch, 2 dc in each stitch around, join with sl st in 3rd ch of
starting chain. (28 dc)
Rnd 3: ch 3, 1 dc in same stitch as join, dc in next stitch, *2 dc in next stitch, 1 dc in next stitch. Repeat
around, join with sl st in 3rd ch of starting chain. (42 dc)
Rnd 4: ch 3, dc in same stitch as join, 1 dc in each of the next 2 stitches, *2 dc in next stitch, 1 dc in each
of the next 2 stitches. repeat around. join with sl st in 3rd ch of starting chain. (56 stitches)
Rnd 5: ch 2, hdc in same stitch, 1 hdc in next 3 stitches, *2 hdc in next stitch, 1 hdc in next 3 stitches.
repeat around, join with sl st in 2nd ch of starting chain. (70 sts from here forward)
Rnd 6: ch 4, tr in each stitch around. Join with sl st in BLO in the 4th ch of starting chain.
Rnd 7: ch 1, sc in BLO of same stitch as join, sc in BLO of each st around. join with sl st in first sc.
Rnd 8: ch 2, *1 FP hdc in next stitch, 1 BP hdc in next st. repeat around, join with sl st in 2nd ch of
starting chain.
Rnds 9 & 10: repeat round 8, with FP in FP, and BP in BP, join with sl st in 2nd chain of starting chain.
Rnd 11: ch 1, sc in BLO of the same stitch as joining, and in each stitch around. join with sl st in 1st sc.
Rnd 12: ch 1, sc in FLO of same stitch as joining and each stitch around. join in 1st sc.
Rnd 13: ch 5 (counts as the first tr + 1sc) (mark the 4th ch to join at the end) now going backwards, skip
1 stitch and tr in the next one. Going forward again, *skip next 2 sts, tr in 3rd, ch 1, tr in the first missedstitch. repeat around, join with sl st in 4nd ch of starting chain.
Rnd 14: ch 1, sc in same stitch as join and each stitch around – with 1 sc between the “X” and 2 sc
inside of the “X”. join with sl st in first sc.
Rnd 15: ch 1 sc in same st as join. 1 sc in each st around. Join with sl st in FLO of first sc.
Rnd 16: ch 1, sc in FLO of same st as join. 1 sc in FLO of each st around. Join with sl st in first sc.
End yarn, weave ends in.
Child’s Stitch Sampler Cap
H hook for child
Needle for weaving ends
Ch 5, join with sl st to form a ring.
Rnd 1: ch 3, make 13 dc in ring, join with sl st in 3rd ch of starting chain. (14 dc)
Rnd 2: ch 3, 1 dc in same stitch as joining stitch, 2 dc in each stitch around, join with sl st in 3rd ch of
starting chain. (28 dc)
Rnd 3: ch 3, 1 dc in same stitch as join, 1 dc in next stitch, *2 dc in next stitch, 1 dc in next stitch.
Repeat around, join with sl st in 3rd ch of starting chain. (42 dc)
Rnd 4: ch 2, hdc in same stitch as join, 1 hdc in next 2 stitches, *2 hdc in next stitch, 1 hdc in next 2
stitchs. repeat around, join with sl st in 2nd ch of starting chain. (56 sts from here forward)
Rnd 5: ch 4, tr in each stitch around. Join with sl st in BLO in 4th ch of starting chain.
Rnd 6: ch 1, 1 sc in BLO of same stitch as join, hdc in BLO in each st around. join with sl st in first sc.
Rnd 7: ch 2, *1 FP hdc in next stitch, 1 BP hdc in next st. repeat around, join with sl st in 2nd ch of
starting chain.
Rnds 8 & 9: repeat round 7, with FP in FP, and BP in BP, join with sl st in 2nd chain of starting chain.
Rnd 10: ch 1, sc in BLO same stitch as joining, and in of each stitch around. join in 1st sc in FOL.
Rnd 11: ch 1, sc in FLO of same stitch as joining and each stitch around. join in 1st sc.
Rnd 12: ch 5 (counts as the first tr + 1sc) (mark the 4th ch to join at the end) now going backwards, skip
1 stitch and tr in the next one. Going forward again, *skip next 2 sts, tr in 3rd, ch 1, tr in the first missedstitch. repeat around, join with sl st in 4nd ch of starting chain.
Rnd 13: ch 1, sc in same stitch as join and each stitch around – with 1 sc between the “X” and 2 sc
inside of the “X”. join with sl st in first sc.
Rnd 14: ch 1 sc in same st as join. 1 sc in each st around. Join with sl st in FLO of first sc.
Rnd 15: ch 1, sc in FLO of same st as join. 1 sc in FLO of each st around. Join with sl st in first sc.
If desired, ch 1, 1 sc in same stitch as joining, 1 RSC in each stitch around. join, end yarn, weave ends
in.
Follow the same hat pattern but change hooks & yarn~
For baby:
Red Heart Jamie yarn (or any 3-ply baby yarn) 3-ply yarn, F hook
For older child - H hook and 3-ply yarn
Sunday, August 24, 2014

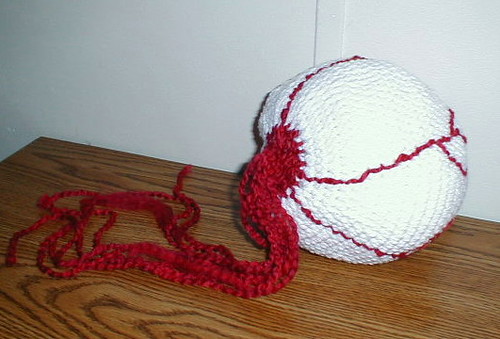
Bloodshot Eyeball Hacky Sack
Copyright July 2007 by Gail E and Wendy G
Worsted Weight yarn;
White
Desired Iris color
Small amount of Black
Red, Homespun
Small amount of dark embroidery thread coordinating with Iris color for edging iris – if desired.
G hook - Yarn needle – Scissors
Fiberfill for stuffing eyeball
Instructions:
Some of the Eyeball is worked in Rounds. At the end of the rounds, you will join with a sl st to the first hdc of
the first stitch of that round, ch 1, hdc in same stitch as join, and continue the count to the next set of 2 hdc.
And some is worked in Spirals. At the end of the round, you do not join, but instead you simply hdc into the
next stitch and move the marker to the new First Stitch.
NOTE: when you are working the Rounds and Spirals, continue to count when coming to the round
marker, move the marker to the new round-first-stitch and continue to count using the NEW round
sequence. (for instance, at the end of a round with the sequence count of “1 hdc in next 15 sts, 2-hdc in
next st” after you move the marker you would continue counting (instead of starting a new count) to “1
hdc in next 16 sts, 2-hdc in next st”)
Center of eye;
With black - Chain 2
Rnd 1: Work 9 half-double crochets in the 2nd chain from hook. Ch 1, 2 hcd in same stitch as join.
Rnd 2: Work 2 half-double crochets in each stitch around (18 hdc) end off yarn.
Attach Iris yarn in any stitch;
Rnd 3: Work 2 half-double crochets in each stitch around (36 hdc). Join with sl st in first stitch as join, ch 1, hdc
in same stitch as join.
Rnd 4: [1 hdc in next 5 stitches, 2 hdc in next stitch] - repeat around. Join with sl st in first stitch as join, ch 1,
hdc in same stitch as join.
Rnd 5: [1 hdc in next 9 stitches, 2 hdc in next stitch] - repeat around
Rnd 6: [1 hdc in next 14 stitches, 2 hdc in next stitch] - repeat around, end off yarn.
From this point on, you will work in the round, but in a spiral. Mark the first stitch of each round as you go--
however the "end" of rounds are only loosely followed in this pattern.
Attach White yarn in any stitch.
Rnd 7: [1 hdc in next 15 stitches, 2 hdc in next stitch] - repeat around. when you get to the last stitch in this
round, do not join, instead make 1 hdc in first stitch of the round and continue counting to the next 2-hdc.
From Round 7 through Round 24, Continue the count as you pass & mark the round end, moving on to the
stitch-count of the next round.
Rnd 8: [1 hdc in next 16 stitches, 2 hdc in next stitch] - repeat around
Rnd 9: [1 hdc in next 17 stitches, 2 hdc in next stitch] - repeat around
Rnd 10: [1 hdc in next 18 stitches, 2 hdc in next stitch] - repeat around
Rnd 11: [1 hdc in next 19 stitches, 2 hdc in next stitch] - repeat around
Rnd 12: [1 hdc in next 20 stitches, 2 hdc in next stitch] - repeat around
Rnds 13 & 14: even 1 half-double crochet in every stitch.
NOTE: It’s easier if you stitch the line around the Iris now, if you want it. I use a double-thickness of
embroidery thread to do this. Or do a round of sl st with a slightly darker or lighter color of yarn.
(Now you begin to decrease reversing the count sequence count)
Rnd 15: [1 hdc in next 20 stitches, hdc dec in next 2 sts] - repeat around
Rnd 16: [1 hdc in next 19 stitches, hdc dec in next 2 sts] - repeat around
Rnd 17: [1 hdc in next 18 stitches, hdc dec in next 2 sts] - repeat around
Rnd 18: [1 hdc in next 17 stitches, hdc dec in next 2 sts]- repeat around
Rnd 19: [1 hdc in next 16 stitches, hdc dec in next 2 sts] - repeat around
Rnd 20: [1 hdc in next 15 stitches, hdc dec in next 2 sts] - repeat around
Rnd 21: [1 hdc in next 14 stitches, hdc dec in next 2 sts] - repeat around
Rnd 22: [1 hdc in next 9 stitches, hdc dec in next 2 sts] - repeat around
Rnd 23: [1 hdc in next 5 stitches, hdc dec in next 2 sts] - repeat around, end off white yarn.
You may now take the marker off of the eyeball.
Stuff eyeball firmly with fiberfill.
Attach red Homespun yarn in any stitch and remove the First Stitch marker.
Rnd 24 to end *Work hdc dec in next 2 sts, repeat from * around. Do not join, simply continue working the
“hdc dec in next 2 stitches” until you have only a very small opening left for the “nerve” tails to exit from.
End off yarn, leaving long tail for a “nerve”.
With a yarn needle and a long piece of red yarn (I use about 5-1/2 to 6 feet of yarn) go through the center back
hole, leaving a long tail hanging out of the hole. Secure by gong around a bar of yarn twice to anchor the
“nerve” then work towards the iris. I use a ‘running stitch’ leaving space between each stitch to fill in on the
return trip from the Iris to the center back, so that all of the yarn tails exit through the center back. I’ve found
that making a braid with 3 strands of yarn at a time then tying a knot near the end will stop the Homespun from
fraying too much.
This pattern has been tested by an outside crocheter, who found no errors. But if you have a problem or find an
error, please email me at gaile44@mchsi.com
Make what changes appeal to you to make this YOUR work of art . . . even though the type of “art” may be in
question, it’s still Art~
Happy Hooking~
Saturday, August 23, 2014
Double Sided One Piece Hot Pad/Pot Holder
Unlike some pot holders, this one is all in one piece. So while you may have two completely different colors/patterns on it, it won't slip or slide in use.
Double Color Pot Holder/Hot Pad - - -


Double Color Pot Holder/Hot Pad - - -
Jan 2006 by Gail E & Wendy G
Need:
2 skeins of contrasting colors of ww cotton yarn
size H hook
Large eye needle for weaving ends
Note: When working Row 2, Always stitch with A to A, and with B to B.
With color A, ch 29, sc in 3rd ch from hook and each ch across, going under only one loop of chain. Drop color, do not finish off.
Row 1: Attach color B with sl st to empty loop of starting chain, at the end opposite of the starting tail. ch 1, sc in same loop as sl st, and in each st across. "Fold" two rows of sc up so that they are back-to-back. ch 1, with side “A” facing you, working “over the top of the pot holder *sc in back loop of B and closest loop of A, repeat from * across. Drop color, do not finish off.
Row 2: Pick up the other color and Ch 1, turn, working over the top of the piece, sc in the horizontal bar (the horizontal bar that you will crochet into is in the same row of the color yarn you just picked up) of the row below all the way across. Ch 1 and turn.
Row 3: "Fold" (it will kind of "fold" automatically as you work along) the two rows of sc up so they are back-to-back. *sc in back loop of the row facing you and the closest loop of the row facing away from you, repeat from * across to end of row. Drop color, do not finish off.
Continue repeating rows 2 & 3 until pot holder is approximately square. End with row 2 of color A. End color B.
Last row: ch 1 with color A, turn, *sl st in back loop of B and closest loop of A, repeat from * across. Drop color, do not finish off.
ch 10, join with sc 3rd stitch away from the corner. sc in next st. hdc in first ch and each ch back to starting point, sl st to the stitch beside starting ch. End yarn, weave in ends.
Tuesday, July 29, 2014
Addition to the Spiderman afghan pattern page
I have added links to my pattern page, they are to two videos that I believe will help with most problems encountered. If either of the ladies who made them want their link removed, please contact me and I will do so. But I feel that the help you are giving the people who are working hard on the afghan are well worth allowing the links to stay on the page.
There are the two video links that I added ;
This one has helped others with questions about the vertical ribbing -
http://www.youtube.com/watch?v=C4qoHUprCSk
And this one seems to be in general work on the afghan -
http://www.youtube.com/watch?v=mS-PTao3mo4
Thank you so much for making the videos. I can not, and know that your videos have helped a LOT of people.
There are the two video links that I added ;
This one has helped others with questions about the vertical ribbing -
http://www.youtube.com/watch?v=C4qoHUprCSk
And this one seems to be in general work on the afghan -
http://www.youtube.com/watch?v=mS-PTao3mo4
Thank you so much for making the videos. I can not, and know that your videos have helped a LOT of people.
Saturday, January 4, 2014
A New Year, A New Goal
Another new year is here, but it seems that it hasn't been but a few weeks since we celebrated the newness of 2013!
As my Mom told me numerous times, the older we get, the faster time passes. Sure was sad to find that she was right. She also told me that I should take better care of myself because in my older years I would be very glad I had. Again, she was 100% right. I'll be 70 this summer and feel more like 90 at the youngest! Yes, I had fun, sometimes had a real blast, but now that it has caught up with me I realize that the fun when young is not worth the pain and suffering when one is older.
Ah well, I Played as a Youngster and now am Paying as an Oldster~ It's kind of like using a credit card for purchases, sooner or later you have to pay the bill.
This past Fall I had another hospital event. Had to go to the ER, feeling awful, and had emergency surgery as quickly as the doctors got there and prep me and themselves. What I had thought was possibly a stomach ulcer, turned out to be my gallbladder. It had already begun going gangrene. Yuck! The doc said that I was very lucky I did not put off coming in any longer, or I might not have made it. Last year it was the appendix, which had not gone gangrene, but did start to ooze poisonous yuck as they lifted it out.
I asked him if there were any other organs that I needed to be on the watch for signs of needing to be taken out, but he said that he thought I was clear now. Sure hope so, doctor and hospital bills are horrendous, even with two health insurance policies! But thank goodness that we do have them!
So now I am trying to get back to crocheting daily, and hubby & I set two goals for 2014, not actually New Year's Resolutions, but goals that we plan to meet by years end.
First, is to eat less and healthier. It sure hurt today to get up and have no pastry waiting to be devoured! But we'll adjust to it in a few weekends. I'm sure that a bowl of oatmeal is much healthier than pastry from Publix, even if it doesn't taste quite as good.
Second, is to declutter and clear the house of things we no longer use. It will be easier now than later on, and we both want the house neater and more enjoyable. But it will be very hard to get rid of things that bring back good memories. Still, it's needful. If we ever have to move into an apartment so we don't have yard & upkeep to do on our home, we would have to have a lot less Stuff.
Sadly, our cats refused to go on the healthier diet with us. They threatened to put mice in the bed and in our shoes if we cut off their treats. While neither of us are afraid of mice, we do draw the line at having them in our bed or shoes. So the cats still get their treats. And we make a lap for them upon demand. And believe me, they demand a LOT! LOL~
But could you turn away a cat being so mannerly while waiting for her share of a buttered biscuit?

On my crochet front, I'm hooking a simple hat for our grandson, and working on the squares for an afghan for my BFF of 46 years. Isn't the pattern lovely?


As my Mom told me numerous times, the older we get, the faster time passes. Sure was sad to find that she was right. She also told me that I should take better care of myself because in my older years I would be very glad I had. Again, she was 100% right. I'll be 70 this summer and feel more like 90 at the youngest! Yes, I had fun, sometimes had a real blast, but now that it has caught up with me I realize that the fun when young is not worth the pain and suffering when one is older.
Ah well, I Played as a Youngster and now am Paying as an Oldster~ It's kind of like using a credit card for purchases, sooner or later you have to pay the bill.
This past Fall I had another hospital event. Had to go to the ER, feeling awful, and had emergency surgery as quickly as the doctors got there and prep me and themselves. What I had thought was possibly a stomach ulcer, turned out to be my gallbladder. It had already begun going gangrene. Yuck! The doc said that I was very lucky I did not put off coming in any longer, or I might not have made it. Last year it was the appendix, which had not gone gangrene, but did start to ooze poisonous yuck as they lifted it out.
I asked him if there were any other organs that I needed to be on the watch for signs of needing to be taken out, but he said that he thought I was clear now. Sure hope so, doctor and hospital bills are horrendous, even with two health insurance policies! But thank goodness that we do have them!
So now I am trying to get back to crocheting daily, and hubby & I set two goals for 2014, not actually New Year's Resolutions, but goals that we plan to meet by years end.
First, is to eat less and healthier. It sure hurt today to get up and have no pastry waiting to be devoured! But we'll adjust to it in a few weekends. I'm sure that a bowl of oatmeal is much healthier than pastry from Publix, even if it doesn't taste quite as good.
Second, is to declutter and clear the house of things we no longer use. It will be easier now than later on, and we both want the house neater and more enjoyable. But it will be very hard to get rid of things that bring back good memories. Still, it's needful. If we ever have to move into an apartment so we don't have yard & upkeep to do on our home, we would have to have a lot less Stuff.
Sadly, our cats refused to go on the healthier diet with us. They threatened to put mice in the bed and in our shoes if we cut off their treats. While neither of us are afraid of mice, we do draw the line at having them in our bed or shoes. So the cats still get their treats. And we make a lap for them upon demand. And believe me, they demand a LOT! LOL~
But could you turn away a cat being so mannerly while waiting for her share of a buttered biscuit?

On my crochet front, I'm hooking a simple hat for our grandson, and working on the squares for an afghan for my BFF of 46 years. Isn't the pattern lovely?


Her colors are rose, dark green, and cream. It is so pretty and will look great in her bedroom!
Ok, so tell me what YOU are up to in this brand new year! I'll be hoping to hear about your goals and plans too~
Wednesday, May 29, 2013
Wow! Want to be more "Green" in your everyday life?
Check out this idea from Mother Earth News telling us how to make our own plastic wrap from 100% cotton fabric and bees wax! Beeswax Fabric
I would never have thought of this, but love the idea. Can't use it for hubby's daily work lunch due to his job. Everything he carries through the gates must be in clear, see-through bags or containers. But for anyone on a "normal" job, this is a great idea!
There are a ton of other great ideas on MEN as well. Ways to go Green, as well as ways to simply live Life easier and better.
Check them out, I don't think you'd be disappointed at all.
Happy Summer!

I would never have thought of this, but love the idea. Can't use it for hubby's daily work lunch due to his job. Everything he carries through the gates must be in clear, see-through bags or containers. But for anyone on a "normal" job, this is a great idea!
There are a ton of other great ideas on MEN as well. Ways to go Green, as well as ways to simply live Life easier and better.
Check them out, I don't think you'd be disappointed at all.
Happy Summer!
Wednesday, May 15, 2013
Spiderman Fan's Afghan
If you have gotten the pattern more than just a few days ago, but have not yet begun to make the afghan, please go back to the pattern here on my blog to see if there are updates you should have.
Due to so many questions from people about certain aspects of the pattern, I have altered some of the wording to help make it easier to understand, and have added a few "notes" for things that are not the same on a round ripple as on a square/rectangular ripple afghan.
And as always, if you have any problems or questions about it, you can reach me at
Stitch_n_Frog at mchsi dot com
Happy Hooking!

Due to so many questions from people about certain aspects of the pattern, I have altered some of the wording to help make it easier to understand, and have added a few "notes" for things that are not the same on a round ripple as on a square/rectangular ripple afghan.
And as always, if you have any problems or questions about it, you can reach me at
Stitch_n_Frog at mchsi dot com
Happy Hooking!
Tuesday, May 7, 2013
Healthy Hands for Crocheters, taken from Crochet World's Talking Crochet Newsletter
This is not my smarts showing, rather it is from Talking Crochet, the newsletter by Crochet World magazine. And is excellent advice.
You can read it here or at Healthy Hands at Talking Crochet Newsletter
I receive their newsletter and it always has good advice, great ideas, and even give-aways. It's free, no cost to us, and very enjoyable to get in your In Box. There's a link at the bottom that will take you to their home page, where you can look around and sign up to receive it too if you want.
* * * * * * * * *
Many of you are such ardent crocheters that you spend several hours a day working the hook. That's wonderful, but it also raises some concerns about maintaining good hand health. Activities that require small, repetitive movements can cause muscle disorders; therefore, it's important for crafters to be aware of the risks and to do what they can to minimize them.
Of course, if you feel pain when you crochet, the best thing to do is consult your doctor. The medical community has been trying to tackle the issue of repetitive muscle disorders for several decades and has made progress in understanding its causes and cures. From my own experience, as someone who crochets many hours a day and has a bit of arthritis, I have learned to follow certain guidelines. Let me share them.
By being attentive to these factors, I have been able to continue to crochet for long periods without causing additional discomfort.
If you'd like to learn more about this topic, there is some interesting information at the U.S. Occupational Safety & Health Administration at this link. The focus here is on workers who do commercial sewing, but there is much that relates to crochet.
Talking Crochet Newsletter
You can read it here or at Healthy Hands at Talking Crochet Newsletter
I receive their newsletter and it always has good advice, great ideas, and even give-aways. It's free, no cost to us, and very enjoyable to get in your In Box. There's a link at the bottom that will take you to their home page, where you can look around and sign up to receive it too if you want.
* * * * * * * * *
Healthy Hands
Many of you are such ardent crocheters that you spend several hours a day working the hook. That's wonderful, but it also raises some concerns about maintaining good hand health. Activities that require small, repetitive movements can cause muscle disorders; therefore, it's important for crafters to be aware of the risks and to do what they can to minimize them.
Of course, if you feel pain when you crochet, the best thing to do is consult your doctor. The medical community has been trying to tackle the issue of repetitive muscle disorders for several decades and has made progress in understanding its causes and cures. From my own experience, as someone who crochets many hours a day and has a bit of arthritis, I have learned to follow certain guidelines. Let me share them.
- Maintain good posture while working.
- Avoid a tight grip on the hook or yarn; keep hands relaxed.
- Take breaks.
- Stretch the hands, fingers, wrists and other parts of the upper arm regularly.
- Use ergonomic hooks.
By being attentive to these factors, I have been able to continue to crochet for long periods without causing additional discomfort.
If you'd like to learn more about this topic, there is some interesting information at the U.S. Occupational Safety & Health Administration at this link. The focus here is on workers who do commercial sewing, but there is much that relates to crochet.
Talking Crochet Newsletter
Tuesday, April 23, 2013
S. L. O. W. Crocheting Year So Far
Have you ever hit a 'slump' in your favorite hobby/pastime? Every now and then, I hit a slump where I simply can't crochet . . . And it's horrible! I miss doing it, and want to do it, but just can't sit still or concentrate enough to manage.
A very nice lady (whom I do not know at all) ordered a Piggy Cell Phone Pouch this past Saturday. Aaaaaargh! I've been in this slump since January and did not think to remove the finished items from my Etsy store . . . .
So I bit the bullet, got out the yarn and hooks, and got going on it. It was not easy, and I had to do it in many many short sessions. About ten minutes was all I could stand to sit 'n crochet at a time. But it is done, and in the mail as of late yesterday afternoon~ Yay!
This is him/it. Hopefully she will like it Ok.

It's not proven yet, but it may have shaken me from the slump. At least I am now working on an Angry Bird scarf for a great-nephew in Arizona. We're mailing a box out there Friday, and I wanted the scarf to go in along with the two hats for his Mom and Grandmother.
So, howz your week shaping up? If my crocheting urge continues, my week is Great!
A very nice lady (whom I do not know at all) ordered a Piggy Cell Phone Pouch this past Saturday. Aaaaaargh! I've been in this slump since January and did not think to remove the finished items from my Etsy store . . . .
So I bit the bullet, got out the yarn and hooks, and got going on it. It was not easy, and I had to do it in many many short sessions. About ten minutes was all I could stand to sit 'n crochet at a time. But it is done, and in the mail as of late yesterday afternoon~ Yay!
This is him/it. Hopefully she will like it Ok.

It's not proven yet, but it may have shaken me from the slump. At least I am now working on an Angry Bird scarf for a great-nephew in Arizona. We're mailing a box out there Friday, and I wanted the scarf to go in along with the two hats for his Mom and Grandmother.
So, howz your week shaping up? If my crocheting urge continues, my week is Great!
Monday, March 25, 2013
And the winner is . . . .
Would Joan Robertson and Dannie-K118 please send your email addresses to me at Stitch_n_Frog@mchsi.com so that I can send the patterns to you?
Since there were only your two comments, I decided to declare the drawing a Tie and give both patterns to both of you~
Happy Hooking!
Since there were only your two comments, I decided to declare the drawing a Tie and give both patterns to both of you~
Happy Hooking!
Saturday, March 23, 2013
Do you ever want to keep an eye on someone?
If so, now is your chance! To win the pattern for my Bloodshot Eyeball, so you can keep an eye on someone, AND a pattern for my OctoGottcha, leave a comment and a winner will be randomly chosen Monday morning.
The Bloodshot Eyeball is a hacky sack with "blood vessels" hanging from the back of the eyeball. It is approximately 6 inches across, and when filled with synthetic fiberfill, is lightweight.

 And we don't want to find our children out chasing cars or sprinkling on water hydrants!
A Winner will be chosen early monday morning~
The Bloodshot Eyeball is a hacky sack with "blood vessels" hanging from the back of the eyeball. It is approximately 6 inches across, and when filled with synthetic fiberfill, is lightweight.

The OctoGottcha looks like an Octopus, but it steals the brain of whoever's head it is placed on. It then puts those brains into their child's head, so please warn the recepient to be very careful not to put it on an animal's head, because he/she will then be given animal brains by their OctoGottcha!

A Winner will be chosen early monday morning~
Thursday, March 21, 2013
Sybil's Knit Slippers
My dear Mother-in-love taught me to make these knit slippers soon after hubby and I were married. I've made them for the entire family through the years, more than one pair. They are comfortable, and warm. They can be below the ankle, to/above the ankle, or up the calf as high as you want.
Grab a pair of needles and make some for yourself, you'll love them!

Size 8 needles
Grab a pair of needles and make some for yourself, you'll love them!

Sybil’s Knit Slippers
I got this pattern verbally from my dear Mother
I use two skeins of worsted weight yarn, Red Heart SuperSize 8 needles
Use 2 strands 4-ply yarn held together throughout the pattern.
For slippers that reach just below the ankle:
Cast on 31 stitches
Row 1: k10, p1, k9, p1, k10
Row 2: k across
Repeat rows 1 & 2 for 4-1/2" for men, 4” fo
Row 1 of foot body: k1, p1 on 11 stitches, k9, p1, k1 on last 11 stitches.
Row 2 of foos body: p1, k1 on 10 stitches, k11, p1, k1 to end.
Repeat these two rows to desired foot length, measuring from heel to to
Next k2tog for 3 rows. Bind off, leaving a long tail to sew slipper together.
Fold up along the P1 line of sitches to shape the slipper. Stitch up the back of the heel. Then stitch
from the toe from tip to start of vertical ribbing to complete the s
For Calf-high slippers:
cast on 91sts
Row 1: k40, p1, k9, p1, k40
Row 2: k across
Repeat these two rows for 4-1/2" for men,
4” for women. End with row 1.
Next; bind off 30sts, repeat row 2 to end.
Next; bind off 30sts, k1, p1 on 11 st, k9,
p1, k1 on last 11 stitches.
Row 1 of foot body: k1, p1 on 11 stitches,
k9, p1, k1 on last 11 stitches.
Row 2 of foos body: p1, k1 on 10 stitches,
k11, p1, k1 to end.
Repeat these two rows to desired foot
length, measuring from heel to toe.
Next k2tog for 3 rows. Bind off, leaving a very long tail for sewing up slipper.
Fold up along the P1 line of sitches to shape the slipper.
the top of the leg. Then stitch from the toe from tip to start of vertical ribbing, continue up the leg to complete the slipper.
Sunday, February 24, 2013
A Beauty Webinar
Cherelynn is doing a free webinar for beauty consultants, if you know an Avon, Arbonne or
MaryKay lady who could use more sales and bridal clients, would you share this
link? Thanks!
Visit http://makeupuniversity.blogspot.com/2013/02/free-webinar-how-to-build-your-bridal_23.html
She won't steer you wrong! Go check it out, you'll be glad you did!
Visit http://makeupuniversity.blogspot.com/2013/02/free-webinar-how-to-build-your-bridal_23.html
She won't steer you wrong! Go check it out, you'll be glad you did!
Thursday, February 21, 2013
Finally!
I finally finished the Kissy! Kissy! Fish Face Hat! Yay!
 I love it, but due to illness and exhaustion, have had a terrible time in completing it. And I'm very happy to have it done so I can mail it to the pattern writer for donation to a children's cancer clinic.
The lady who wrote the pattern has a shop on Ravelry Crochet By Darleen Hopkins

The lady who wrote the pattern has a shop on Ravelry Crochet By Darleen Hopkins
Tuesday, February 19, 2013
Moving within the home is a pain in the Everywhere!
Our adult daughter has lived with us for the past few years, and just recently moved into her own apartment. So we are in the process of moving, but without leaving home~
My old yarn room is going to become the pantry we never had, and my new yarn room is being set up in the den which was her room for those years. The room is much larger, and better lit than my old yarn room, thanks to this room having 8 windows.
Currently it looks a bit like this - - -
 And that's just one side of the room! So it may take me a good while to locate specific yarn, or pattern, or magazine, or even the container of buttons that I need to finish the new curtain tie-backs that I'm crocheting.
But when it is finished, it will be my Happy Room! A place that I can go to just to sit in my rocking chair, and enjoy being surrounded by yarn and projects in various stages of completion. In other words, my dream room~
And possibly the best thing of all, our daughter likes her apartment and likes doing things her way, when she wants to do them. So I don't even have to feel guilty about using "her room" for my yarny goodness. Besides, her yarn is out there too! ~LOL~
My old yarn room is going to become the pantry we never had, and my new yarn room is being set up in the den which was her room for those years. The room is much larger, and better lit than my old yarn room, thanks to this room having 8 windows.
Currently it looks a bit like this - - -

But when it is finished, it will be my Happy Room! A place that I can go to just to sit in my rocking chair, and enjoy being surrounded by yarn and projects in various stages of completion. In other words, my dream room~
And possibly the best thing of all, our daughter likes her apartment and likes doing things her way, when she wants to do them. So I don't even have to feel guilty about using "her room" for my yarny goodness. Besides, her yarn is out there too! ~LOL~
Tuesday, February 5, 2013
It just doesn't come any cuter than this!

Little Owl's Hut
I bought the pattern the day it hit her store, and am SO anxious to start work on it! The patterns at this store are amazing and every time I think they can't come up with another one even half as good as the last, they come up with one equal to or better!
Go take a look and you'll see for yourself. I do not get anything at all for posting about their patterns. I do it only so maybe they will get known by more and more people. And because I believe that their work is of such quality that they deserve every Kudo and Pat On The Back that we can give to them.
Happy Hooking!
Saturday, December 29, 2012
A New Year is Almost Here
Only two days left in 2012! I remember how as a child it was very difficult for me to remember that it was 1950, not 1949. Wow! How time flies! You should enjoy every day of your Life, because time passes so very fast and before you know it, you will feel the same way about your long-gone childhood.
So what's going to be on your table on New Year's Day? We'll have our traditional meal - Blackeye peas, rice, greens, and cornbread, with a apple pie/cake & ice cream for desert. That Christmas ham will season the beans, and do it deliciously. One of the main reasons we always have a ham at Christmas, is for the blackeye peas on New Years! LOL~
I finished a test pattern for a Sock Monkey hat this week. Isn't it cute? It's by Tammy Harder.

So what's going to be on your table on New Year's Day? We'll have our traditional meal - Blackeye peas, rice, greens, and cornbread, with a apple pie/cake & ice cream for desert. That Christmas ham will season the beans, and do it deliciously. One of the main reasons we always have a ham at Christmas, is for the blackeye peas on New Years! LOL~
I finished a test pattern for a Sock Monkey hat this week. Isn't it cute? It's by Tammy Harder.

The pattern can be found on Ravelry at http://www.ravelry.com/patterns/library/sock-monkey-hat---newborn-through-adult-sizes
I hope you have a good New Year's Eve and Day and that the new year brings happiness and good health to you and yours~
Subscribe to:
Posts (Atom)